Traverse Global v11.2 - Service Repair
Forecasts
Use the Forecasts function to forecast demand at the assembly level to represent your prediction for future unknown sales. The Forecasts function combines the master schedule (make) and the sales forecast (buy) options into a single screen. The procurement method for the IN item/location will determine whether making or buying the item(s).
Multiple forecasts are supported in the Forecasts function, allowing you to work with forecasts for specific groups of items as desired.
Forecasts include three pieces of information: what is being sold, when, and in what quantities for individual items and locations. This information feeds the current and future demand and supply for inventory items you build or buy. The RP reports give you a net picture of the future. This picture helps you determine when to place purchase and work orders to supply assembly components or inventory items themselves in a timely manner to fill demand.
If you enter sales forecast information for a kit that involves an assembled item, keep in mind that the sales forecast affects the master schedule for the assembled item. Forecasts for kits and assembled items are reflected in their components quantities when you generate RP data.
The Forecasts function allows you to manually enter specific items to the forecast code. Use the Generate button on the toolbar to generate the date buckets for the forecast, as well as choose one or more criteria to populate the grid. For instance, you can add a location, product line, item ID, or ABC class to the criteria to automatically add all items that meet the criteria to the grid.
Use the Clear Zeros button to delete all records from the detail grid where the quantity for ALL dates is zero. This leaves only the records that have a quantity in the date column.
When you run the Generate RP Data function, the system will look at forecast data to generate demand based on forecast records.

Creating a Forecast
- Click the New button, on the toolbar, to open a blank record.
- Enter a code for the new forecast in the Forecast Code field.
- If you are creating a new forecast, you can use the Copy function by selecting an existing forecast in the Copy From drop-down list.
- Enter a description of the forecast in the Description field.
- Accept or edit the forecast start date in the Start Date field.
- Accept or edit the forecast end date in the End Date field.
- Select a period definition from the Period Definition ID field.
- Click the Save button, on the toolbar, to save the new forecast. Once you click Save, the system creates a list of dates for which you need to provide projected quantities. The dates are determined by the period definition and the start/end dates.
- Enter items you want to include on the forecast into the grid. Alternately, you can use the Generate button to load the grid with items that match the criteria in the Generate dialog box.
 Generate
Use the Generate button on the toolbar to generate the date buckets for the forecast, as well as choose one or more criteria to populate the grid. For instance, you can add a location, product line, item ID, or ABC class to the criteria to automatically add all items that meet the criteria to the grid.
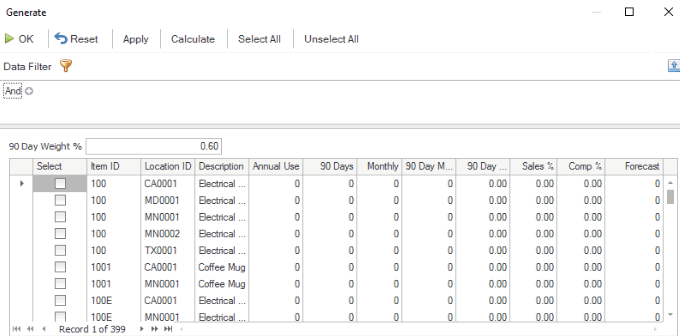
- Click Apply to apply the data filter. The items that meet the criteria will be loaded into the grid.
- As necessary, enter a 90 Day Weight % to use to calculate the forecast.
- Mark the Select check box for the items you want to include in the forecast. Click Select All to mark all check boxes, or click Unselect All to clear all check boxes.
- Accept or select the unit of measure for which to calculate the forecast in the Unit column (use the Column Chooser to add columns to the grid, as needed).
- Click Calculate to calculate the forecast for the selected item(s).Explanation of calculations:
Annual Use: Total inventory history decrease transactions converted to base UOM for the last 365 days.
90 Days: Total inventory history decrease transactions converted to base UOM for the last 90 days.
Monthly: Annual Use/12
90 Days Monthly Avg: 90 Days/3
90 Day Weight: Defaults in from the text box. You can edit the 90 Day Weight for individual items, if necessary; you will get a message asking if you want to recalculate the forecast.
Sales %: Total inventory history decrease transactions for sales divided by total inventory history decrease transactions.
Comp %: 1 - Sales %
Forecast: Calculated as ([Monthly] * (1 – [90 Day Weight])) + ([90 Day Monthly Avg] * [90 Day Weight])
You can edit the Forecast quantity after calculation, as needed.
Editing a Forecast
- Select an item from the Item ID field.
- Select the item's location from the Location ID field.
- Edit the fields as necessary.
- Click the Save button, on the toolbar, to save any changes made to the forecast.
Deleting a Forecast
- Select an item from the Item ID field.
- Select the item's location from the Location ID field.
- Click the Delete button, on the toolbar, to delete the selected forecast.
- Click Yes at the "Are you sure you want to delete selected record(s)?" prompt.